How to Use the Color Online Tool
There is a particular kind of quiet that comes with coloring. The world outside keeps going, but for a few minutes, the only thing that matters is which shade of blue belongs in this corner of the sky. That feeling is why coloringsheets.art exists.
The Color Online tool was built for exactly that moment. It sits inside your browser, ready whenever you are, and it asks nothing of you in return. No account. No installation. No subscription. You open a page, you pick a color, and you begin.
This guide walks you through everything the tool can do. Some of it you will use right away. Some of it you will discover slowly, over time, and wonder how you ever colored without it.
A blank coloring page is not empty. It is waiting.
Four Ways to Start
From the Coloring Library
The Library is where most people begin, and for good reason. It holds thousands of free coloring pages across dozens of categories. Animals, cartoon characters, intricate mandalas, seasonal designs, flowers, vehicles, fantasy worlds, superheroes, nature scenes. The range is genuinely surprising.
Browse until something catches your eye. Open the page. Click the Color Online button. The full studio opens instantly, your design already loaded and ready on the canvas. From that moment, the page belongs to you.
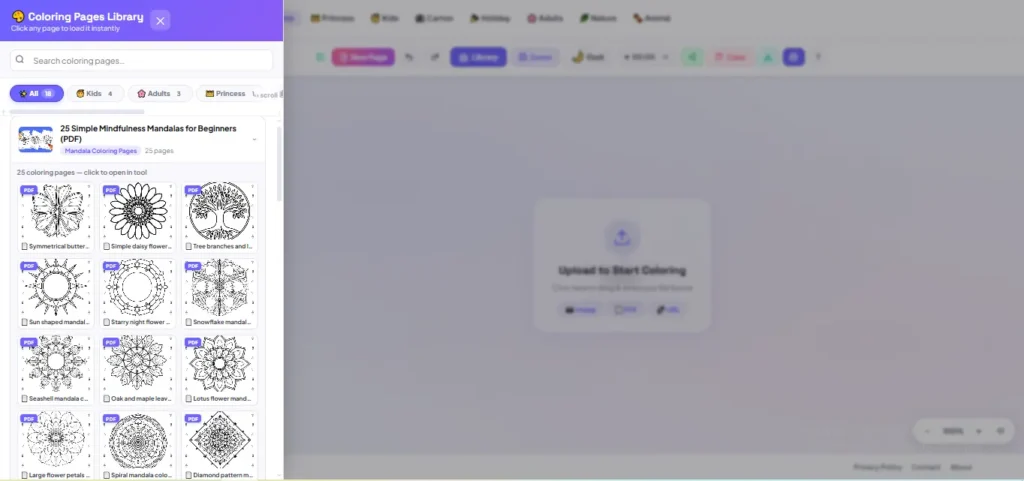
Worth knowing: New designs are added to the Library regularly. If nothing is calling to you today, come back in a few days. There is always something new.
Your Own Image or PDF
Maybe you have a drawing your child made at school, scanned and saved on your phone. Or a sketch you want to bring to life. Or a PDF worksheet from a classroom project. You can upload any of these directly into the Color Online tool and color it exactly as you would any of our own pages.
Drag the file onto the canvas, or use the upload option to find it on your device. Photos, illustrations, PDFs, hand-drawn scans. It all works.
A thought: Photograph a child’s pencil drawing and upload it. Color it together. Print it. That piece of paper becomes something neither of you will throw away.
Paste an Image from the Web
If you find an image online that you want to color, you do not need to save it to your device first. Copy the web address and paste it directly into the tool. The image loads and the studio opens around it, ready to go.
A Blank Canvas
Sometimes the most freeing thing is an empty page. Choose a blank canvas, set your preferred size and background color, and start from nothing. Draw, paint, and build something that exists nowhere else. There is no template. There are no lines to stay inside. Just the canvas and whatever comes next.
Getting to Know the Studio
Once your coloring page is open, you are inside the studio. It is designed to feel natural very quickly. On desktop, the toolbar sits along the left side. On mobile, it anchors to the bottom of the screen and stays there even when you zoom in. Your tools never scroll away from you.
The canvas takes up most of the screen. That is intentional. The header at the top holds just the essentials: Undo, Redo, Download, and Print. Everything else lives in the sidebar, organized so that what you need most is always close to hand.
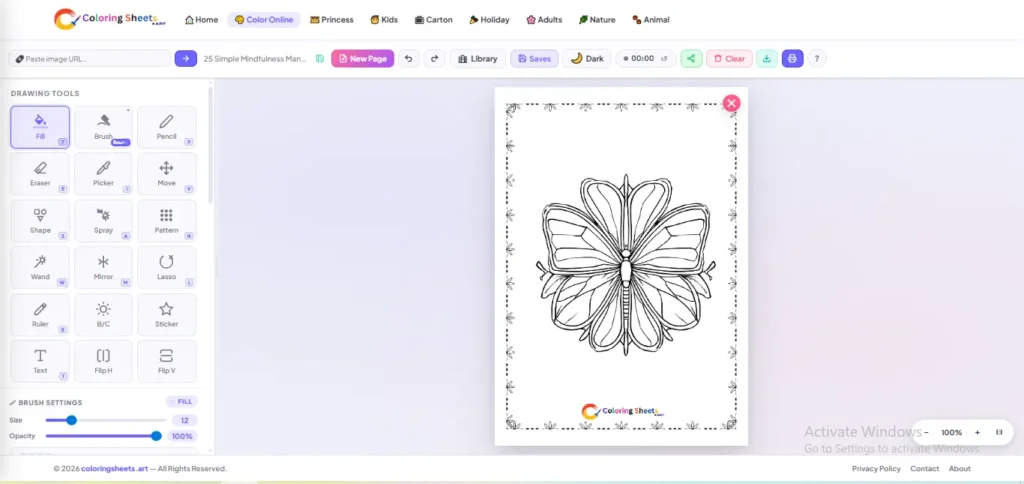
The Tools, One by One
There is no single right way to use these tools. Some people start with the Fill tool and work inward toward detail. Others begin with the Brush and build color slowly, layer by layer. The tools are here to support however your creativity wants to move.
Fill
This is where most coloring sessions begin. Click inside any enclosed shape and the whole area fills with your chosen color in an instant. Sky, clothing, background, water. One click and it is done.
The Fill tool has a gap control setting. If the outline of a page has very thin lines or tiny gaps, color can sometimes leak past the borders. Adjusting the gap setting tells the fill how far to reach, which keeps your color where it belongs.
Try this: Fill the large areas first to establish your color palette across the whole page. Then go back with smaller, more precise tools to add shading and personality on top.
Brush
The Brush is the most expressive tool in the studio. It follows your mouse or finger and leaves a smooth, painted stroke behind. You choose how wide it is and how transparent, and that combination determines whether you are making bold confident marks or building up color gently, wash by wash.
There are different brush types available. A round brush gives you smooth, flowing strokes good for most purposes. A flat brush makes clean edges and is useful for filling shapes with sharp corners. A soft brush fades at its edges, which is perfect when you want colors to blend into each other rather than sit side by side with a hard line between them.
Try this: Lower the brush opacity and paint the same area two or three times. Each pass adds a little more depth. The result feels painted, not clicked.
Pencil
The Pencil draws fine, precise lines with hard edges. It does not soften or spread. What you draw is exactly what you get.
Use it for the details that give a coloring page its character. Eyelashes. Tiny stars in a night sky. The texture of feathers or bark. The lines that make a face feel real. The Brush handles the broad strokes. The Pencil handles everything the Brush cannot reach.
Eraser
The Eraser removes color from the canvas without touching the original outline. Everything you have drawn can be undone with it. Everything that was there when you opened the page stays exactly as it was.
Use it when you change your mind about a color, when you want to clean up an edge, or when you want to deliberately erase back to white to create a highlight or a shimmer. Correcting and refining is part of the process. The Eraser makes it painless.
Color Picker
You have used a particular shade of orange on a character’s jacket. Now you want the same shade somewhere else on the page. Rather than trying to match it from memory on the color wheel, reach for the Color Picker. Click anywhere on the canvas and that exact color becomes your active color, ready to use again.
It is a small feature. But once you start using it, you will reach for it constantly.
Magic Wand
Some designs have large areas made of many connected sections that all belong to the same visual space. Coloring each one individually takes time. The Magic Wand finds those connections and floods the right region with color in a single click.
There is a tolerance control that determines how aggressively the wand selects. Keep it low and it selects only very similar areas. Raise it and it reaches further, pulling in a wider range of connected space. Getting a feel for this takes one or two tries and then becomes second nature.
Try this: Use the Magic Wand to quickly lay down base colors across the whole page. Then go back with the Brush to add shading and depth. Fast foundation, careful finish.
Symmetry and Mandala Mode
This is the feature that surprises people most. Turn on Symmetry mode and every stroke you make is mirrored across the canvas at the same time. Draw on one side and the same mark appears on the other side, perfectly reflected, without you having to do anything.
Increase the number of mirror lines and the mirroring multiplies. Your single stroke becomes four, eight, sixteen identical marks radiating outward from the center. This is how mandalas are made. Not painstakingly, section by section, but fluidly, with the symmetry doing the patient work while you simply draw.
Try this: Start from the center of the canvas and work slowly outward. Do not plan too carefully. The most beautiful mandalas are the ones that surprised the person who made them.
Spray Paint
The Spray Paint tool scatters color in a soft, diffuse pattern rather than a solid stroke. Hold it still and color builds gradually in one spot. Move it quickly and you get a light dusting. The effect is atmospheric, hazy, and very natural-looking.
It is the right tool for glowing light effects, soft shadows along the edges of shapes, dreamy backgrounds, and anything where you want color to fade rather than stop. Used with a lighter version of your base color, it adds instant dimension to a flat fill.
Pattern Fill
Instead of a plain color, Pattern Fill lets you fill any area with a repeating texture. Dots, stripes, crosshatch, checkers, grids, and others. Pick a pattern, pick a color, and click. The area fills with texture rather than solid color.
For even richer results, you can switch the color mode to Gradient within the Pattern Fill settings. The pattern itself then transitions between two colors, which creates something that looks far more complex and considered than a simple flat fill.
Gradient
A gradient fills an area with a smooth transition between two colors. Blue fading into purple. Gold melting into orange. One color dissolving quietly into another.
Select Gradient mode from within the Pattern Fill panel and choose from a curated set of color combinations. Then click any area of your design. What was flat becomes dimensional. What was simple becomes something that looks crafted.
Try this: Apply a warm sunset gradient to the background of any outdoor scene. Even a very simple coloring page changes completely. The sky alone can make the whole thing feel finished.
Lasso
The Lasso is your most flexible creative decision. Draw a freehand loop around any part of the canvas. Once you have made your selection, you have three choices: fill that area with a new color, erase it entirely, or pick it up and move it somewhere else on the page.
Changed your mind about where something sits in the composition? Move it. Want to remove one element without disturbing the rest? Select just that part and erase. The Lasso works on both the color you have applied and on the original outline itself, which makes it unusually powerful.
Shapes
Circles, rectangles, triangles, and straight lines. Drawn in solid fill or outline only. The Shape tool is for decoration, for framing, for adding geometric elements that the original design does not have.
Draw a border around the whole page. Add a speech bubble to a character. Lay geometric shapes over a background to turn a plain area into something abstract and interesting. Simple shapes layered thoughtfully become striking additions.
Ruler
The Ruler draws a perfectly straight line between two points. Click once to set the start, move to where you want the line to end, and click again. Hold Shift and the line snaps to exact horizontal, vertical, or 45-degree angles.
You can draw in solid or dashed style. Use it for rays of light behind a character, architectural lines in a building scene, fence posts, railway tracks, geometric grids, or any moment where a hand-drawn line simply would not be straight enough.
Stickers
More than ninety sticker designs across nine categories. Animals, hearts, stars, nature, food, sports, celebrations, symbols, and more. Each one can be placed in filled style, outline only, or with a soft drop shadow.
Adjust the size and transparency before placing. A large sticker placed boldly becomes a focal point. A cluster of small ones placed lightly becomes a decorative field. The same sticker feels completely different depending on how you use it.
Text
Type directly onto the canvas. Choose your color and size. Position the text exactly where you want it and rotate it to the right angle. When everything looks right, apply it and the words become part of your artwork permanently.
A coloring page becomes a birthday card when you add a name. It becomes a classroom display when you add a label. It becomes a personal gift when you add a message that only the recipient would understand.
Flip
Flip the entire canvas horizontally or vertically. Everything moves together, your coloring and the original outline, all at once, perfectly. Left becomes right. Top becomes bottom.
It sounds like a small feature. In practice it changes how you see the design entirely. Some compositions reveal a better balance when flipped. Some designs become something almost new. It takes a second and costs nothing to try.
Brightness and Contrast
Two sliders that affect the overall feel of the canvas. Brightness makes everything lighter or darker. Contrast makes the difference between light and dark areas more or less pronounced.
If you have uploaded an image and the outlines look faint, a boost in contrast brings them forward. If a finished coloring page feels too sharp and digital, reducing the brightness slightly makes the colors feel richer and warmer. Small adjustments make a noticeable difference.
The Features That Make Everything Better
Beyond the drawing tools themselves, the Color Online studio includes several features that shape how the whole experience feels. These are not tools in the traditional sense. They are the things that make the time you spend here genuinely pleasant.
Undo and Redo
Every coloring session involves changing your mind. That is not a flaw in the process. That is the process. The Undo button is always in the top header, and Ctrl+Z on a keyboard works just as well. Step backward through your decisions as many times as you need.
Changed your mind about the undo? Redo brings it back. There is no penalty for experimenting. Try a color, see how it looks, and undo it if it does not work. The tool expects you to explore.
Zoom
Zoom in to work on fine details without straining your eyes. The plus and minus buttons in the corner of the canvas handle this on desktop. On mobile, pinch to zoom as you normally would. The keyboard shortcuts are the equals sign to zoom in and the minus sign to zoom out, with zero to reset back to the original view.
On mobile, the toolbars stay fixed to the bottom of the screen even when the canvas is fully zoomed in. Your tools are always reachable, no matter how deep into a detail you go.
The Coloring Timer
There is a small timer in the header of the studio. It starts counting the moment you open a coloring page and continues quietly in the background while you work.
Pause it, reset it, ignore it entirely. It is there for the people who find it useful. For parents timing a creative activity. For anyone who wants to know how much time passed in what felt like ten minutes but turned out to be an hour. It does not interrupt. It does not judge. It simply counts.
Worth knowing: The timer starts automatically when your coloring page loads. You can pause and resume it at any point from the header, or reset it to zero to start fresh.
Dark Mode

The toggle between light and dark display is in the header. Dark mode switches the entire studio to a darker background, which some people find easier on the eyes in low-light conditions, and which gives the coloring page itself a different feeling to work against.
Your preference is remembered. Open the tool next time and it will be exactly as you left it, light or dark, without you having to set it again.
Canvas Grid
When working on a blank canvas, you can turn on a grid overlay. The grid draws a series of evenly spaced lines across the canvas, giving you a reference structure to work against. You can set how wide the grid squares are, which determines how fine or how loose the grid feels.
It is particularly useful for freehand drawing when symmetry or proportion matters. The grid does not appear in your finished artwork when you download or print. It is only there while you are working, as a quiet guide.
Coloring for Every Kind of Vision
Color is not experienced the same way by everyone. A significant number of people, particularly men, see the world with a different relationship between certain colors. The Color Online tool was built with this in mind from the beginning.
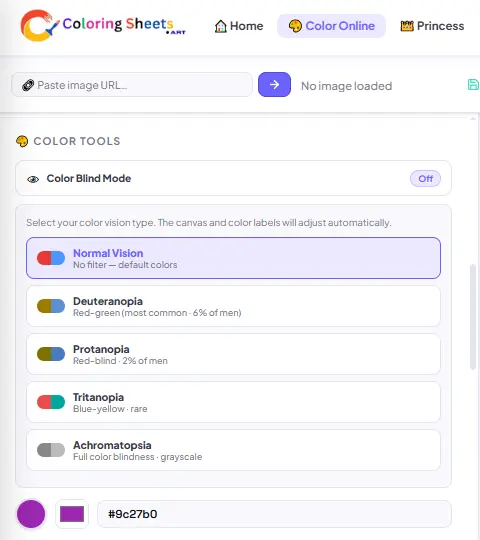
Under the Color Tools section in the sidebar, you can choose from five display modes. Each one adjusts how colors appear across the entire studio, so that coloring feels natural and comfortable regardless of how you see color.
Normal Vision
The default setting. No filter applied. Colors appear as they are across the full visible spectrum.
Deuteranopia
The most common form of color vision difference, affecting around six percent of men. Deuteranopia makes it difficult to distinguish between red and green tones. This mode adjusts the display so those distinctions become clearer and more usable.
Protanopia
Red-blind color vision, affecting approximately two percent of men. Protanopia reduces the sensitivity to red light, which changes how a wide range of colors appear. This mode compensates for that shift.
Tritanopia
A rarer condition that affects the perception of blue and yellow tones. Tritanopia is significantly less common than red-green color differences. This mode adjusts the display for those who experience it.
Achromatopsia
Full color blindness. People with achromatopsia see the world in shades of gray rather than in color. This mode converts the studio display to grayscale, so that the tool remains usable and the coloring experience remains meaningful even without color perception.
When any accessibility mode is active, color names are shown next to each swatch in the palette. You do not have to guess. The tool tells you what each color is called, which makes choosing and working with them much easier.
A note on this: These modes change how you see the studio. They do not change the final artwork. Your downloaded or printed piece will always reflect the actual colors, whatever mode you were using while creating it.
Choosing Your Colors
The color palette sits in the sidebar and gives you a curated set of colors to work with immediately. Click any swatch and it becomes your active color, ready to apply with whatever tool you have selected.
For more precision, the full color wheel is one click away. Every color that exists is reachable from there. You can also save custom colors to the palette if you find shades you want to come back to.
Colors that sit near each other in the spectrum tend to feel harmonious together. Colors on opposite sides tend to feel bold and energetic. Neither is wrong. That instinct you have about which colors look right together, the one that is hard to explain, that instinct is usually correct. Trust it.
Your Work Is Always Safe
How Saving Works
The tool saves your progress automatically, every few seconds, in the background. You do not press a button. You do not confirm anything. It simply saves while you work, quietly and continuously.
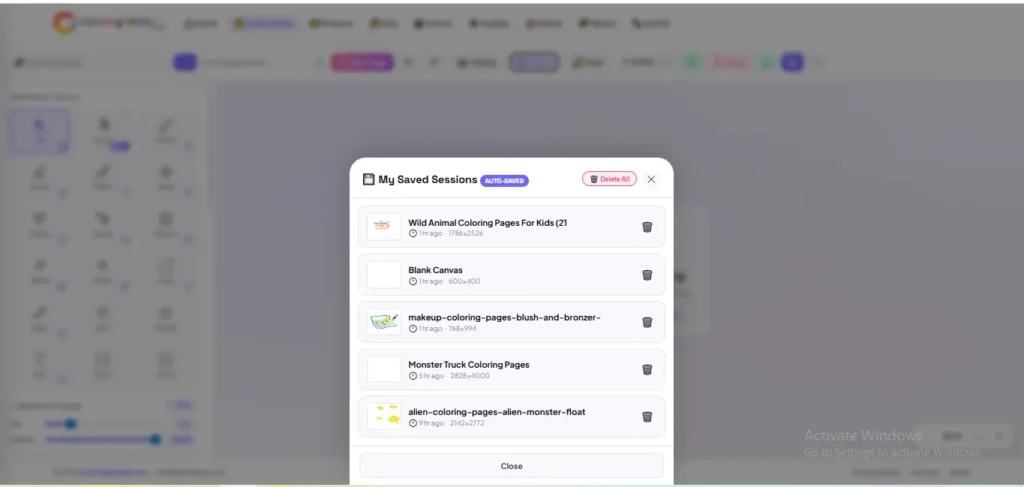
Close the tab. Close the browser. Walk away for a week. Come back to the same coloring page and everything is exactly as you left it. The half-colored mandala waiting at step seven. The landscape with the sky finished and the trees just started. It will all be there.
Your work does not go anywhere. It waits.
Multiple Sessions
If you are working on several coloring pages at once, each one keeps its own separate session. Switch between them freely. The progress on each page is stored independently and does not affect the others.
One thing to note: Your sessions are stored in your browser on your device. They are not linked to an account and they are not stored on our servers. Clearing your browser data will erase them. For anything you want to keep, download it once you are happy with it.
Keyboard Shortcuts
Every tool has a keyboard shortcut. Once you know them, you stop reaching for the sidebar as often and the whole experience gets faster and more fluid. Press the question mark key at any point while inside the studio to see the full list on screen. The ones you will use most often are listed here.
- F — Fill tool
- B — Brush
- P — Pencil
- E — Eraser
- W — Magic Wand
- M — Symmetry and Mandala mode
- A — Spray Paint
- N — Pattern Fill
- S — Shapes
- R — Ruler
- L — Lasso
- T — Text tool
- I — Color Picker
- V — Move and Pan
- [ and ] — Brush size smaller or larger
- Ctrl Z — Undo
- + and – — Zoom in and out
- 0 — Reset zoom to original size
- ? — Open the full shortcuts guide inside the tool
Finishing Your Artwork
When your coloring page is done, two options are in the header.
Download
Your finished page saves to your device as a high-quality image file. The resolution is set at a professional standard, which means the colors on screen are the colors you will see on paper. Sharp and vivid at full size.
Send your artwork directly to your printer. The same high quality. The same sharpness. What comes out is something you could frame.
A small tip: Photo paper or premium matte paper makes a real difference. The colors come out deeper and the result looks like something made intentionally, not just printed at home.
One Last Thing
Coloring is a strange and quietly powerful thing. It asks very little of you and gives back something that is hard to name. A few minutes of focus. A sense of something completed. The simple pleasure of watching color spread across a page.
The tools in this guide are here for all of it. Some you will use every session. Some you will try once and come back to months later. All of them were built to stay out of your way and let the coloring itself be the point.
The Library is open. Thousands of pages, every category, every style. One of them is waiting for your colors right now.
The best time to start coloring is right now. The second best time was yesterday.
coloringsheets.art
Open the Library and find your next page.